
MODULE 17: ELECTRICAL ESTIMATING & PROJECT MANAGEMENT
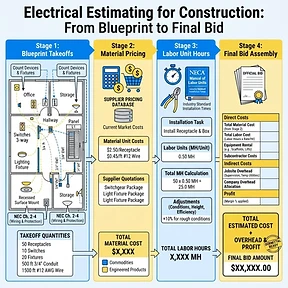
FIG · NEC Ch. 2-4 (design basis); NECA Manual of Labor Units
Electrical Estimating for Construction: From Blueprint to Final Bid
A step-by-step estimating walkthrough: blueprint takeoffs, material pricing, labor unit hours, and assembling a defensible final bid.
YOUR PROGRESS
REAL-TIME METRICS0% complete
0 of 1 done
Not attempted yet
Why estimating accuracy wins or loses the job
An electrical estimate is a prediction of what a job will cost, made before a single hole is drilled. It has to cover four cost buckets: material, labor, equipment and subcontracts, and indirect costs. Profit is only what remains after all four are covered and company overhead is paid.
A bid that is too high loses the work. A bid that is too low wins the work and loses money on every hour. The estimator's job is not to guess a number the customer will like. It is to build a defensible number from measured quantities, current prices, and documented labor units, then price the risk honestly.
Phase 1 - Review the blueprints and build the takeoff
The takeoff is the measured quantity of every item the job requires. Every dollar in the bid traces back to it. Get the takeoff wrong and no amount of careful pricing will save the estimate.
Step 1: Assemble the complete document set
Before you open a scale or start counting, confirm you have everything:
- Architectural, structural, mechanical, plumbing, and fire protection drawings
- Electrical power plans, lighting plans, panel schedules, one-line diagram, and riser diagram
- Site plan, utility service information, and point of connection
- Division 26 (Electrical) and Division 27 (Communications) specifications
- Addenda, RFIs, and responses issued during the bid period
- General conditions and supplementary conditions
Check the drawing index against the sheets in your set. Note every revision date. Log each addendum and the date you received it. Estimating from a partial or outdated set is the single most common cause of a losing bid.
Step 2: Read the drawings in a fixed order
Read the same way on every job so nothing hides from you:
- Cover sheet and drawing index
- General notes and symbol legend
- Electrical site plan and utility coordination
- Single-line diagram, riser diagram, and panel schedules
- Floor plans: power, lighting, and systems
- Enlarged plans and details
- Schedules: lighting fixture schedule, panel schedule, load schedule
- Division 26 and 27 written specifications
Specifications routinely add scope that the drawings do not show: testing, commissioning, spare parts, submittals, training, as-builts, and product restrictions that change what you can buy.
Step 3: Mark up the plans
Work on a printed set or a dedicated digital markup file, never the only copy. Use a consistent color code:
- One color for raceway
- One color for conductors
- One color for devices and boxes
- One color for equipment and gear
- One color for demolition or existing conditions
Trace each circuit from the panel to the last outlet and mark it as you count. Unmarked plans produce double counts; partially marked plans produce missed home runs.
Step 4: Do the takeoff by system, not by room
Counting room by room causes you to skip corridors, closets, and mechanical spaces. Take off by system and use the same system list every time:
- Service and distribution (utility coordination, transformer, switchgear, panels)
- Branch power (receptacles, equipment connections, dedicated circuits)
- Lighting and lighting controls
- Fire alarm
- Low voltage, data, and security
- Motor and HVAC connections
- Site and exterior
Build a takeoff sheet with one line per item: description, quantity, unit, and a note on where it came from.
| Item | Quantity | Unit | Source | |---|---|---|---| | 3/4 in. EMT | 1,850 | LF | Power and lighting plans, measured | | 4 in. square boxes | 80 | ea | Device count plus junctions | | #12 THHN | 6,000 | LF | 1,850 LF x 3 conductors + spares | | 2x4 LED troffer | 96 | ea | Lighting fixture schedule | | 42-circuit panelboard | 2 | ea | Panel schedules |
Step 5: Measure raceway correctly
- Measure the actual route the conduit will take, including vertical drops to devices and up to ceiling space.
- Add length for offsets, bends around structure, and slack at boxes.
- Count every fitting, coupling, connector, strap, and support separately. Supports are frequently undercounted and never free.
- Follow the specification, not just the code minimum. A spec calling for a larger raceway than code requires changes both material and labor.
Step 6: Derive conductor quantities
Conductor length equals raceway length multiplied by the number of conductors in the raceway, plus waste. Include equipment grounding conductors, spares the spec requires, and control wiring.
Do not forget conductors that never appear on a plan: pigtails, grounding electrode conductors, bonding jumpers, and wire pulled through existing raceway.
Step 7: Reconcile before you price
Cross-check your counts against independent sources on the drawing set:
- Fixture count against the lighting fixture schedule
- Circuit count against the panel schedules
- Device count against the architectural room plans
- Equipment connections against the mechanical equipment schedule
When two sources disagree, resolve it with an RFI before bid day, not after award.
Phase 2 - Calculate material costs
Step 1: Build a priced takeoff
Every line in the takeoff gets a unit cost, an extended cost, a vendor, and a quote date. A lump sum with no backup cannot be reviewed, defended, or adjusted when the scope changes.
Step 2: Use real current pricing
- Get written quotes for large or volatile items: switchgear, transformers, panels, generators, and lighting packages.
- Use a current price book or your supplier agreement for commodity material.
- Record the quote date and expiration on every line. A quote that expires before award is not a price, it is a hope.
- Confirm whether quoted prices include or exclude freight, tax, and uncrating.
Step 3: Add waste and breakage
Material is consumed beyond the installed quantity through cuts, drops, damage, and theft. Apply waste by category rather than one blanket percentage.
| Material | Typical waste factor | |---|---| | Conduit | 3 to 5% | | Conductors | 5 to 10% | | Boxes and fittings | 3 to 5% | | Devices and plates | 2 to 3% | | Fixtures | 2% | | Distribution equipment | 0% |
Step 4: Add freight, tax, and handling
Freight can be significant on conduit, wire reels, and gear. Sales tax rules vary by state and by project type, and some jobs are tax exempt with the right certificate. Confirm before you apply a rate.
Step 5: Handle long-lead items and escalation
For gear and lighting with long lead times, price the delivery window you actually expect, and state in the proposal which price is firm and which is subject to adjustment. On a job bid today and built next year, escalation is a real cost, not a rounding error.
Step 6: Subtotal by system
Keep material subtotals separated by system. When the owner deletes the lighting package or adds data cabling, you can reprice that system instead of rebuilding the whole estimate.
Phase 3 - Estimate labor unit hours
Labor is usually the largest and least predictable part of an electrical estimate. It is also the part most often estimated by feel. Labor units replace feel with a documented number.
Step 1: Choose a labor unit source
Use a recognized published source and stay consistent with it:
- NECA Manual of Labor Units
- R.S. Means electrical cost data
- BNi building news cost data
- Manufacturer installation data for specialty equipment
- Your own historical hours from completed jobs
Whichever source you use, understand what it assumes. Published units typically assume average conditions, a competent crew, normal ceiling heights, and uninterrupted access.
Step 2: Break the work into measurable items
Labor units apply to units of work, so the takeoff must be broken down the same way: feet of raceway by size and type, feet of conductor by size, each box, each device, each fixture, each piece of equipment.
Step 3: Multiply quantity by labor unit
Labor hours equal quantity multiplied by the labor unit for that item.
| Work item | Quantity | Unit | Labor unit (hr/unit) | Hours | |---|---|---|---|---| | 3/4 in. EMT rough-in | 1,850 | LF | 0.055 | 101.8 | | #12 conductor pulling | 6,000 | LF | 0.010 | 60.0 | | Box rough-in | 80 | ea | 0.55 | 44.0 | | Device trim | 42 | ea | 0.35 | 14.7 | | LED troffer installation | 96 | ea | 0.45 | 43.2 | | Panel and gear setting | 1 | ea | 24.0 | 24.0 | | Productive labor total | | | | 287.7 |
Step 4: Adjust for actual job conditions
Published units describe an average job. Yours is not average. Apply documented factors to reflect reality.
| Condition | Typical adjustment | |---|---| | Work above 12 ft requiring lifts or scaffolding | +10 to 25% | | Occupied building with restricted hours | +15 to 30% | | Congested ceiling or tightly coordinated areas | +10 to 20% | | Winter or extreme heat exposure | +5 to 15% | | Demo and remodel work in existing construction | +15 to 35% | | Inexperienced crew or heavy apprentice mix | +10 to 25% | | Overtime or compressed schedule | +10 to 25% | | Long travel or remote site | Add per diem and travel hours |
Step 5: Add non-productive labor
A crew does not spend every paid hour installing. Account for the rest explicitly:
- Mobilization and demobilization
- Layout and field coordination
- Material receiving, staging, and handling
- Supervision and foreman time
- Submittals, coordination meetings, and inspections
- Cleanup, punch list, and closeout
- Testing, commissioning, and training
Non-productive labor typically runs 10 to 20% of productive hours depending on job size and complexity. Small jobs carry a higher percentage because mobilization and supervision do not scale down.
Step 6: Convert hours to dollars with a blended rate
Use the fully burdened cost of the crew, not the journeyman wage. The blended rate includes:
- Base wages for the actual journeyman and apprentice mix
- Payroll taxes
- Workers compensation insurance
- Health and retirement benefits
- Any union or contractual additions
A crew with a heavy apprentice mix has a lower blended rate but needs a higher labor factor for productivity. Model both, do not just lower the rate.
Phase 4 - Compile the final bid
Step 1: Assemble direct costs
Total material, total labor dollars, equipment rental or purchase, and subcontractor quotes. These are the costs you can trace directly to the work.
Step 2: Add job indirect costs
Costs caused by this specific job but not by a specific installed item:
- Temporary power and lighting
- Site trailer, storage container, and security
- Permits and inspection fees
- Bonds and insurance required by the contract
- Small tools and consumables
- Truck and fuel
- Cleanup and disposal
Step 3: Add company overhead
Company overhead is what it costs to keep the doors open: office staff, estimating, vehicles, software, insurance, and facilities. It is normally applied as a percentage of direct cost and is recovered on every job. If overhead is not in the bid, the job is donating money to the company.
Step 4: Add contingency for the real risk
Contingency is not padding. It is a priced allowance for identified unknowns:
- Drawing coordination gaps
- Unforeseen existing conditions on remodel work
- Weather and schedule exposure
- Small-scope creep that will not be processed as a change order
Typical ranges run 2 to 5% on a well-documented plan-and-spec job, higher on fast-track, design-build, or renovation work.
Step 5: Add profit
Profit is a deliberate business decision, not a leftover. Decide the margin target before you total the bid, based on competition, risk, backlog, and strategic value of the client.
Step 6: Review the bid before it leaves the office
Run a formal review, not a glance:
- Re-add every page and confirm the math
- Compare the total to a cost-per-square-foot benchmark for similar work
- Compare labor hours to a benchmark for the same scope
- Confirm every alternates and unit price is priced separately
- Confirm exclusions are written down and specific
- Have a second estimator check quantities on the largest line items
Step 7: Write the proposal with clear inclusions and exclusions
The proposal defines what you agreed to build. Be explicit:
- Inclusions: scope, systems, and work you are providing
- Exclusions: permits, testing, firestopping, concrete, painting, patch and repair, data cabling, owner-furnished equipment
- Assumptions: drawing revisions used, site conditions assumed, schedule duration, access and staging assumed
- Clarifications: alternates, unit prices, escalation, and lead-time risk
- Payment terms and validity period: how long the price holds
Worked example: 2,400 sq ft office tenant fit-out
Material
| Category | Cost | |---|---| | Conduit, fittings, and supports | $2,900 | | Conductors | $2,520 | | Boxes, devices, and plates | $1,050 | | Lighting package | $6,528 | | Distribution equipment | $4,200 | | Material subtotal | $17,198 | | Waste at 5% | $860 | | Sales tax at 7% | $1,264 | | Total material | $19,322 |
Labor
- Productive hours from the labor unit tables: 287.7 hr
- Job factor at 1.15 for congested ceiling and occupied building: 330.8 hr
- Non-productive labor at 12%: 370.5 hr
- Blended rate of $78.00 per hour: $28,899
Bid build-up
| Line | Amount | |---|---| | Material | $19,322 | | Labor | $28,899 | | Equipment rental and small tools | $1,200 | | Direct cost | $49,421 | | Job overhead at 8% | $3,954 | | Company overhead at 10% | $5,338 | | Contingency at 3% | $1,761 | | Subtotal | $60,474 | | Profit at 12% | $7,257 | | Bid price | $67,731 |
Sanity check: $67,731 divided by 2,400 sq ft is about $28.22 per square foot. Compare that against similar completed tenant fit-outs. A number far outside the benchmark range is a signal to recheck quantities, not to accept the total.
Industry best practices for accuracy
- Estimate only from a complete, current document set, and log every addendum received.
- Do the takeoff and the pricing on the same dated revision of the drawings.
- Take off by system using a standard checklist so corridors, mechanical rooms, and site work are never skipped.
- Price major equipment from written quotes, never from a stale price book.
- Use labor units you can defend, and write down which source and edition you used.
- Apply job condition factors explicitly and document each one.
- Include non-productive labor and supervision as separate line items.
- Use a fully burdened blended crew rate, not a single journeyman wage.
- Keep a database of actual hours and actual material from completed jobs, and update your labor units annually.
- Have a second estimator review the quantities and the math before bid day.
- Use a scope checklist to ask what you might have missed: fire alarm, data, controls, testing, commissioning, permits, firestopping, patch and repair.
- Quantify risk in a contingency line instead of hiding it in inflated unit prices.
- Document inclusions, exclusions, assumptions, and clarifications in every proposal.
- Track bid hit rate and margin variance after each job closes, and feed the results back into your units.
- Never let a target price drive the takeoff. Estimate the work that is drawn, then decide whether to bid it.
Common estimating mistakes
- Missing branch circuit home runs and equipment grounding conductors
- Leaving fire alarm, data, or lighting controls out of the scope
- Forgetting permits, testing, commissioning, as-builts, and owner training
- Undercounting supports, strut, anchors, and firestopping
- Ignoring lift, scaffolding, and access constraints
- Using copper or gear pricing that is months out of date
- Applying one crew rate to a mixed journeyman and apprentice crew
- Adding overtime hours without a productivity loss factor
- Carrying no contingency on a fast-track or poorly coordinated set
- Submitting a bid with vague exclusions, then eating the disputed scope
Pre-bid checklist
- Drawing set complete and revisions confirmed
- All addenda received and incorporated
- Specifications read, including Division 27 and product restrictions
- Takeoff completed by system and reconciled to schedules
- Raceway, fittings, supports, and conductor lengths verified
- Major equipment quoted in writing with lead times
- Waste, freight, tax, and escalation applied
- Labor units sourced, documented, and adjusted for conditions
- Non-productive labor, supervision, and equipment included
- Job overhead, company overhead, contingency, and profit applied
- Total compared to cost-per-square-foot and labor-hour benchmarks
- Second review completed and math re-added
- Proposal includes inclusions, exclusions, assumptions, and price validity